

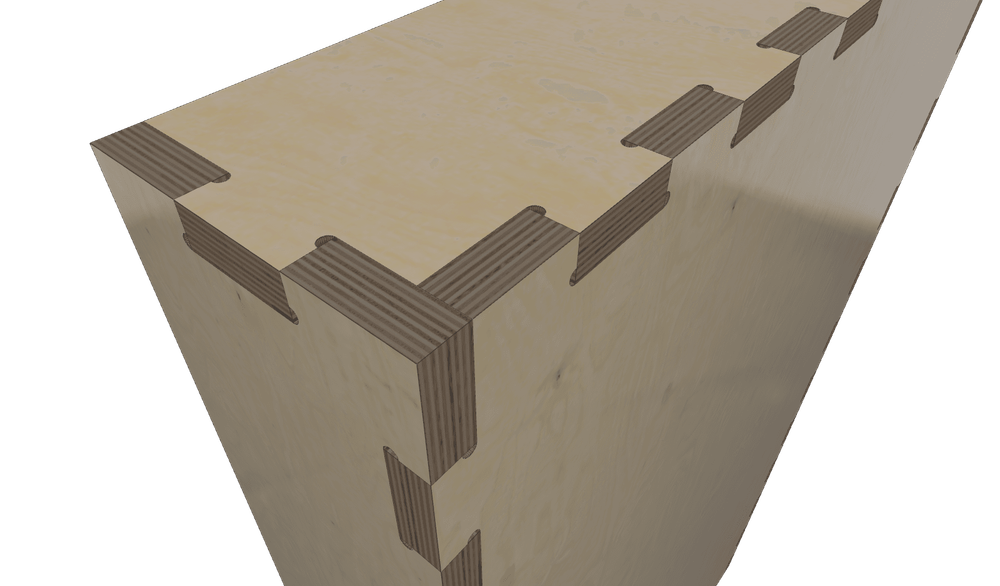
Interlocking Plywood Joints: Gap-Free, Fastener-Free Seams
Posted: November 6, 2026 in #Wood Nerds
Plywood already has a grain problem. The face is a veneer. The core has gaps. A joint that works in maple can land on air in 3/4 in sheathing and hinge instead of lock.
The interlocking joints I actually cut in sheet goods are a short list. Fingers at a corner. Tabs into slots in a face. A rabbet for a back or a bottom. A half-lap when two parts of the same thickness meet in line. Puzzle tabs when I want the thing to come apart.
Glue the ones that stay together. Leave the ones that have to knock down.
Box joints and finger joints
In the shop these are the same corner: rectangular pins, two boards, the pattern shows on the outside. People also use “finger joint” for the cutterhead scarf that turns two short boards into one long one. That is not this.
Depth is the thickness of the piece on the outside. Through joint, the pin should finish flush. People mix depth with width and then blame the fit.
Width is how chunky the pins look, and whether they sit on solid ply. Glue area on a through finger joint is mostly the sides of the pins. Splitting the edge into many tiny pins does not magically add strength. It adds places to snap, and on cheap sheet a narrow pin can sit entirely in a void. I keep fingers near the thickness on 3 mm to 6 mm stock, and about 3/4 in to 1-1/4 in on 18 mm Baltic birch. The layout I use is in how fingers work.
An odd count puts a finger on both ends of the panel. A leftover sliver on the end is the one that breaks off.
Tabs and slots
A shelf into a cabinet side. A divider into a slot. The tab is on the end of one part. The slot is in the face of the other. Alignment first, glue second. Less glue face than a row of fingers, faster to assemble, and the outside of the carcass can stay clean.
This is the joint a lot of laser-cut furniture is. It is also how a back panel can locate without a row of pins around the rim.
The slot has to match the measured thickness of the tab’s sheet, not the stamp on the bundle. I have cut an 18 mm slot for plywood that measured 17.2. The shelf rattled, or the side split, depending on which way I was wrong.
Rabbets, half-laps, puzzle tabs
Rabbet. A back, a bottom, or a drawer panel sitting in a step instead of a row of fingers. One piece keeps its full thickness. The other gets the step. That is the joint when a panel should disappear into a box.
Double rabbet. A step on both pieces. Two panels meet, neither one shows a full-thickness end.
Half-lap. Two similar, in-line parts. Each one loses half the intersection. A CNC joint. The table saw does this with a dado. It is not a corner of fingers.
Puzzle. Interlocking tabs that pull apart. Knock-down, a display, a shipping crate. Friction and a pin beat glue here. If you would break the joint to move it, do not glue it.
Miter. Two parts of the same type, 45°, no interlocking. Picture frames. Almost no glue surface. Tape or a fastener while it cures.
Pick the joint from the job
| Job | Joint |
|---|---|
| Drawer, box corner, organizer | Fingers, glued |
| Shelf into a side | Tabs and slots |
| Back or bottom that should vanish | Rabbet |
| Two rails in line | Half-lap |
| Flat-pack that comes apart | Puzzle tabs, or slots and a pin |
| Frame with hidden end grain | Miter |
A table-saw box-joint jig still wins a run of identical drawers in thick stock. The pin equals the dado. The dado equals the finger. Test on scrap, then run the batch.
A CNC or a laser wins when the sizes mix, the stock is thin, or the next cabinet is two inches wider. The machine cuts the joint from the file. A round bit needs corner relief so a square tab can seat. A laser does not. The beam is already the corner.
Fit
There is no universal clearance. 0.002 in of interference is a number someone wrote down for a different machine and a different sheet.
Measure the plywood. Design the slot to that number. Cut a coupon: one tab, one slot, from the same sheet, in both directions if you are on a laser. Press fit is thumb pressure. Glue fit is a hair of room so PVA has somewhere to go and the clamp closes the joint. On plywood I use the glue fit. Thickness moves across a cheap sheet. A press fit sized on the thin spot splits the face on the thick spot.
If the coupon needs sanding, the slot is tight. Open it and cut another coupon. Do not tune a full sheet with sandpaper.
A laser often burns a different width in X than in Y. Measure both. One number is a compromise. MakerCase and Boxes.py take one number. That is why a generated box still gets a tweak when the two axes disagree.
On a CNC, the bit is round. Dogbones, or some other corner relief, at every inside corner a mating part has to enter. Skip that and you file every slot by hand. Lasers cut a sharp corner. They do not want a router dogbone.
Cutting without shredding the face
CNC. A compression bit keeps both faces of Baltic birch from fuzzing. Sharp matters more than a feed chart. A sacrificial layer under the sheet hides the exit. Climb the last pass if the face veneer is chipping. I do not publish a single IPM for 3/4 in birch. Bit, machine, and sheet are three different numbers.
Laser. The enemy is a burned edge that widens the slot. A test grid on scrap from the same batch beats a speed you read on a forum. Masking tape keeps smoke off the face. It does not clean the edge you are gluing. Sand that.
Table saw and router. Backer on the exit. The two end fingers are the ones that show.
Glue, or don’t
Interior furniture, load-bearing, it stays in one piece: PVA. Dry-fit the whole assembly. Number the faces. If a joint needs a mallet, sand it now. Clamp until the seam closes. Plywood edges crush past that.
Polyurethane foams into a gap. I save it for a joint I already know is sloppy.
Outdoor, a porch, an unheated garage: the sheet will move. Waterproof glue (Titebond III or epoxy) still holds a permanent box. Seal the edges. If the thing has to come apart, skip the glue and use screws through oversized holes, or puzzle tabs, so the parts can move without splitting a pin.
Tape is not a joint. It can hold a seam while glue cures. It does not replace glue on a carcass, and it does not make a knock-down.
The seam you can see
Voids in the ply edge show. Sawdust from the same sheet mixed with glue, pressed in, left to shrink, then a second pass. Color-matched filler on Baltic birch, because the edge is pale.
Sand the joint flat with a block, 120 then 180 then 220. A random-orbit pad dishes the seam. End grain and face grain sand at different rates. Check with a straightedge.
Generators, and what they actually do
MakerCase: a finger-joint box, fast. Boxes.py: more box styles, still a box. Cuttle: parametric parts in the browser. Fusion: anything, and you will draw the joint.
GCrafter treats the joint as part of the design. Fingers, rabbets, double rabbets, half-laps, miters, puzzle tabs. Change the thickness, the fingers come with it. Kerf lives on the machine, X and Y separate, because a laser often burns the two directions differently. Corner relief lives there too, so a laser project does not inherit a router dogbone.
It is sheet goods. No sculpted surfaces, no compound-angle chair. A plain cube is faster in MakerCase.
FAQ
How much kerf for laser-cut fingers in 3 mm plywood?
Measure yours. A CO2 laser in birch is often around 0.15 mm to 0.25 mm. That is a sanity check, not your number. Cut a square, measure both directions, programmed size minus measured size is the kerf. Half of that is the offset on each edge. 3 mm and 6 mm on the same machine are two tests.
Do these joints need screws as well as glue?
A glued finger joint in Baltic birch, sitting on solid ply, fails in the veneer before it fails in the glue. Fasteners do not add much on a permanent interior box. Screws through oversized holes are for joints that have to move, or for a box you sealed instead of gluing.
Tight on one axis, loose on the other.
The beam is not the same in X and Y. Measure each. Change the offset for the axis that fought you. A generator with one kerf value cannot fix that.
Minimum finger width on 18 mm Baltic birch?
Stay above about half the thickness, so nothing under about 9 mm, and I usually run 3/4 in to 1-1/4 in so the pin bridges a void. Depth is the other piece’s thickness, not two-thirds of something. Through joint, flush with the outside face.
Waterproof for outdoors?
Waterproof glue and sealed edges, on a box that stays together. Skip glue and use mechanical fasteners or puzzle tabs on anything you want to take apart. A glued joint that swells and has nowhere to go will telegraph the seam and can split a pin.
Happy making.
Andy